Tag: surya namaskar

  • Unlock the Secrets of Hatha Yoga: A Positive Journey for Beginners

    Unlock the Secrets of Hatha Yoga: A Positive Journey for Beginners

    Yoga is an ancient and dynamic practice that has its roots in India, and among a wide range of different yoga styles, Hatha yoga is considered the beginning and foundation for modern yoga styles. The word hatha has a meaning infused, which translates as “ha” meaning sun and “tha” meaning moon in Sanskrit. It showcases and puts much value in the concept of balance, which represents using opposing energies within us in union.

    If you are a beginner and are exploring your way into yoga, then practicing Hatha yoga can bring you a number of great benefits. It includes a subtle mix of various asana practices and mindful breathing techniques (pranayamas), which not only improve your flexibility but also strengthen your body and enhance your overall well-being. While regular practice can help with a lot of things, including stress reduction and fostering inner peace,. 

    So if you are curious about how yoga can enhance and improve the quality of your life and how much potential it has for changing your life, then Hatha yoga is the perfect to begin the oracle.

    Hatha Yoga

    The Essentials of Hatha Yoga Practice

    Asanas (Postures): The Foundation of Movement

    Asanas, or the physical postures, are the core aspects of Hatha yoga, and in this section, we will discuss exploring and maintaining some fundamentals to have an effective and safe practice.

    Alignment and Breathwork: The Guiding Principles

    Before beginning any specific posture, you need to keep these two things in mind:

    Alignment:

    Proper alignment is the only way to save yourself from any injury or mishap during the practice. While ensuring safety, they also maximise the benefit of each pose. Choose a qualified and experienced yoga instructor, as it will be helpful to provide you with the correct guidance on optimal alignment for each asana.

    Breathwork (Pranayama):

    In yoga, breath is considered a powerful bridge between mind and body. When you coordinate your body movements with your breath, it brings focus and control to your practice. It’s best to focus on inhaling while you open your body and exhaling as you release the tension.

    Beginner-Friendly Asanas:

    Let’s take a quick note on some basic poses, categorized by how they function:

    Standing Poses (Balance and Strength):

    Tadasana (Mountain Pose):
    • Stand tall with your knees straight.
    • Keep your feet hip-width apart.
    • Ground through your soles.
    • Stretch your arms up and stand on your feet.
    • Come down, stand at your feet, and put our hands down. Repeat a few times.
    Vrikshasana (Tree Pose):
    • Stand straight and tall to balance your body on one leg.
    • Hold the other leg and place it on the inside of your thighs.
    • Join both your palms in a Namaste and bring it to your chest.
    • Hold the pose and breathe steadily.
    Benefits of Standing Poses
    • It helps reduce the overall body weight.
    • Strengthen the ankles, hips, and chest.
    • Improves digestion and concentration.
    • It calms the mind and releases stress.
    • Stretch the thigh muscles and abdominal organs.

    Forward Bends (Flexibility and Inner Peace):

    Balasana (Child’s Pose):
    • Kneel down on the floor.
    • Keep your feet placed on the mat.
    • Take a breath and spread your knees to the length of your hips.
    • Keep your shoulders on your knees.
    • Extend your hands straight upwards and rest them on the mat.
    Uttanasana (Standing Forward Fold):
    • Stand straight on your feet and keep your spine straight.
    • Balance your weight equally on both legs.
    • Keep your arms over your head and motion your breathing while inhaling.
    • Enhale, stretch your body, and hinge at the hips.
    • Bend forward completely with a flat back.
    • Fold your body down towards your feet.
    Benefits of forward-bending poses:
    • Strengthen the thighs, knees, and legs.
    • It helps reduce tension in the lower back.
    • It helps in stretching the back, spine, and hips.
    • It calms the mind and balances the nervous system.
    • Improves the digestive system.

    Twists (Detoxification and Digestion):

    Marjariasana (Cat-Cow Pose):
    • Sit in the table-top position.
    • Keep your palms, knees, and toes on the floor.
    • Engage your core and draw your belly button inward.
    • For the cat pose, arch the back and drag your belly towards the mat.
    • Hold your breath and feel the stretch in your back and core.
    • For the cow pose, exhale and round the back towards the ceiling.
    • Tuck your chin to the chest while engaging your core.
    • Feel like you are pushing the floor away from you.
    • Hold your breath and feel the stretch in your neck and shoulders.
    Vakrasana (Seated Twist):
    • Sit on the floor and extend your legs in front.
    • Engage your core and keep your spine erect and straight.
    • Extend your arms out to the sides while keeping your palms facing down.
    • Fold your right leg and bring your foot outside of your left thigh.
    • Bring your left arm behind you while keeping the right one on the left knee.
    • Maintain breathing, and repeat it on the other side.
    Benefits of Twists:
    • Improves muscular balance and coordination.
    • It calms the nervous system.
    • Creates space in the hips, shoulder, and spine.
    • It helps relax the muscles around the spine.
    • Aid in decompressing the spinal column.

    Sun Salutations (Surya Namaskar):

    Hatha Yoga - Surya Namaskar

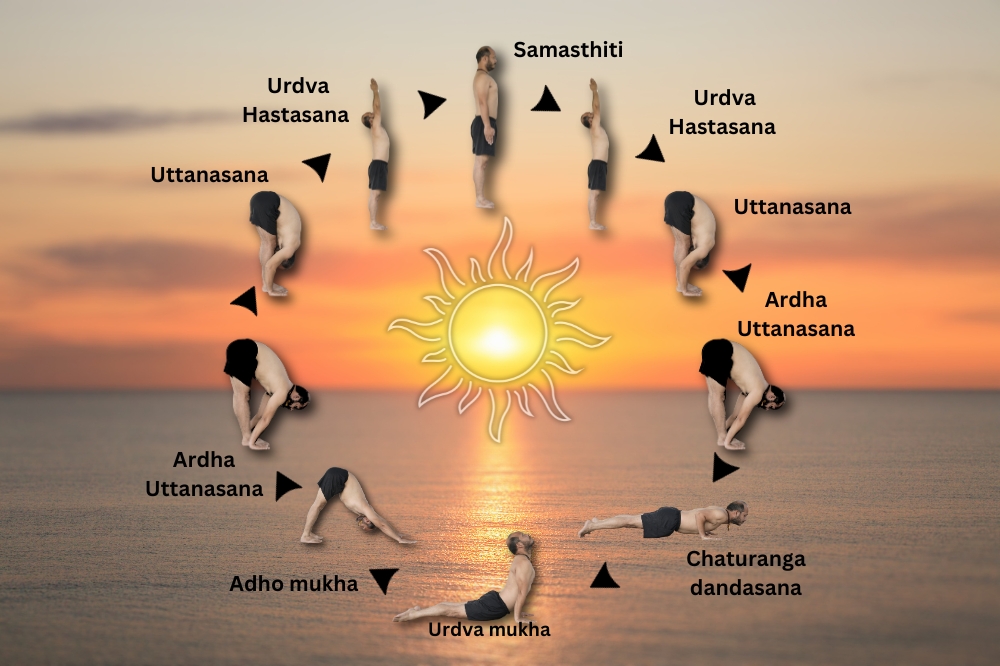
    Sun salutations are the foundational sequences that can be performed first or at any time. These sequences link a series of several pictures together in a flowing movement that is synchronised by breath. They are perfect for a complete body workout and can be practiced at various speeds depending on the exercise level of the individual or person doing it.

    These are the beginning yoga poses in Hatha yoga, but as you progress in your practice, you will get to explore a wide range of asanas that will further enhance your flexibility and practice.

    Pranayama (Breathing Techniques): The Power of the Breath

    Hatha Yoga - Pranayama

    Breath plays a vital role in yoga practice, as it is considered the life force. When you understand the connection our body has between the breath and the movements we do, it allows you to control your body’s energy (prana) and enhance and improve your overall practice.

    Simple breathing exercises:

    Ujjayi (Victorious Breath):

    In this breathing technique, you need to constrict your throat slightly while inhaling and exhaling, creating a soft, hissing sound. This breathing technique focuses mainly on the mind and helps in energising the body.

    Dirga Swasam (Three-Part Breath):

    As stated by the name, you are required to divide your breath into three parts. First you will fill your lower belly, then you will move to the mid-ribs and, in the end, the upper chest. And then you will have to exhale in the reversing sequence. The breath brings peace and promotes overall relaxation by calming your nervous system.

    Benefits of Mindful Breathing:

    Mindful breathing techniques help you build focus and create a sense of inner peace and well-being. When you focus solely on your breathing, it helps in distracting your mind and reducing stress while improving overall concentration and boosting the sense of calmness within.

    Getting Started with Hatha Yoga: The Essentials You Need

    We have already discussed the asanas and postures and what you will learn. But still, there might be many questions coming into your mind about beginning the class. This section will give you the knowledge to navigate your first class and make you feel comfortable while stepping onto your yoga mat.

    A Breakdown of the Class Structure:

    Every Hatha yoga class follows a well-defined set of structures that allow you to form practice and ease into the practice with rhythm. Here is what you can expect:

    • Warm-up (5–10 minutes): You will begin with some gentle movements and stretches to prepare your body for more activeness and asana practice.
    • Asana Practice (30–45 minutes): This is the essential part of the class, where you will flow both physically and mentally through a sequence of postures that are designed specifically to improve overall bodily strength, flexibility, and balance.
    • Cool-down (5–10 minutes): After some heavy movements, you will go through some calming stretches and postures to help your body get calm and transition from exertion to relaxation.
    • Relaxation (5–10 minutes): The class will end with a relaxation pose like Savasana (corpse pose), which is the final stage that allows your body and mind to completely relax and integrate the practice.

    Respecting Etiquette:

    Respect and mindfulness are essential elements to keep in mind while practicing yoga. Here are some helpful points to remember in order to maintain an inclusive and positive environment in the classroom:

    • Arrive early: Punctuality is the key; try to arrive a few minutes early for the class. This will allow you adequate time to settle in, resolve your query, and find a comfortable spot.
    • Maintain personal space: While keeping a focus on your practice, do not forget to be aware of your fellow yogis too. Maintain a respectful distance between the mats for better focus.

    Choosing Your Perfect Class:

    For individuals with different levels, there are a variety of Hatha yoga class types, each catering to the specific needs of individuals. Here is how you can find the right fit for you:

    • Beginner Hatha: These classes are designed for newcomers and teach you the fundamental postures of Hatha Yoga with clear instructions and modifications for beginners.
    • Gentle Hatha: These classes are beneficial for those individuals who are going slow in their practice with some limitations, as these classes focus on relaxation and general stretches only.
    • Restorative Hatha: These classes utilise props for support and include advanced postures for passive stretching and deep relaxation.

    Finding a Qualified Instructor:

    A supportive and qualified instructor plays a vital role in guiding you safely and effectively in your yoga journey. It is essential to look for someone with years of experience in teaching Hatha Yoga.

    Also, look for a yoga school that is registered with the Yoga Alliance and has a good reputation for teaching and conducting classes, such as Bali Yogshala

    Preparing for Your First Class:

    Don’t be nervous; just be mentally prepared, and it can ease your first-class jitters. Here’s what you can pack and bring to the class:

    • Comfortable Clothing: Wear loose clothes that allow you to move freely. You can also go for natural fabrics like cotton.
    • Yoga Mat: A yoga mat is a one-time investment, so get one that provides ample support and cushioning.

    Conclusion:

    As you begin your journey with the practice of Hatha yoga, remember the array of benefits it offers. Do not forget to maintain a regular practice, as it is the key to a flexible and strong body with improved balance. But apart from its physical aspects, it can also be a powerful tool for various mental issues, which include stress management, inner peace, and relaxation. The mindful breathing techniques this yoga offers will not only benefit you during the class but can also help you become calmer and more focused in your everyday life.

    The wait is over. Just pack your bag, get your mat, and begin learning Hatha yoga now. There are countless resources available to you to support you on your journey. Many reputable yoga studios, such as Bali Yogshala, offer introductory classes to provide you with a wealth of information and proper guidance and inspiration. So take the first step and begin your practice while discouraging the immense benefits of this beautiful practice.

    Get in Touch:
    Best Yoga Teacher Training In Bali | 100 Hour Yoga Teacher Training In Bali | 200 Hour Yoga Teacher Training In Bali

  • Surya Namaskar: A Beginner’s Guide to Sun Salutations

    Surya Namaskar: A Beginner’s Guide to Sun Salutations

    The sun salutation, also known as Surya Namaskar in Sanskrit, is a sequence of yoga poses, as determined by the name, practiced in the morning with a sun rise that links the body movement with breath. It is one of the most beautiful and best ways to warm up your body before any class while building strength and improving flexibility for better alignment. Usually, this practice is often used in the morning or before any yoga class, but you can practice it anytime as a full-body workout.

    But even if you are a beginner or a practiced yogi, practicing this requires a series of steps to be followed with focus so that you can easily enjoy the benefits of these sun salutations. In this guide, we will get you through all the poses step by step with modifications. So let’s get into the learning without wasting a second, with the multitude of benefits it offers for both body and mind.

    Benefits of Sun Salutations

    Warm-up for the body:

    Sun salutations are a great way to warm up and prepare your body for the day’s practice, yoga classes, and any physical activity. They help in moving all the muscle groups in your body gently while increasing the blood flow and loosening up all the tight areas for better practice.

    Improves flexibility and strength:

    Various poses aligned in sun salutation are usually related to stretching, which also strengthens different muscle groups throughout the body. So if you practice these poses daily, it can eventually result in improved flexibility and build up strength in the back, arms, legs, and core.

    Increases circulation:

    Practicing these salutations requires body strength, and as with any other practice, it gets your heart rate up, resulting in improved circulation throughout the body. This practice helps deliver the major nutrients and oxygen to the cells more efficiently and removes waste products from the body.

    Promotes mindfulness:

    Practicing these salutations requires focus on your breath and movements, which lead to a quiet mind and promote mindfulness. Through this, you can better start your day in a great way or de-stress your mind after a hectic day.

    Before you begin: Be Prepared

    Before you begin your movements, preparing for them is essential for an enhanced practice. While not necessary, having a yoga mat will help you with better grip and cushioning for your practice. Additionally, having comfortable clothes on will allow for better and easier movements.

    Breathe Easy:

    Sun salutations are all about synchronising your breath with your body movements, so here’s a quick tip:

    • Inhale: Fill your belly with air and breathe in through your nose as you expand your body or lengthen it (while keeping your arms up or getting back into the plank).
    • Exhale: Release all your tension as you exhale through your nose or mouth while you fold or contract your body. (Usually during a forward fold or downward-facing dog.).

    Keeping your focus on these breathing techniques will help you move your body with flexibility and fluidity while connecting it with your mind throughout the sequences.

    The Sun Salutation Sequence: Step-by-Step 

    The sun salutation sequences are a flowing series of twelve poses that are linked together with each other with breath. Let’s get to it:

    1. Mountain Pose (Tadasana):

    How to do:

    • This pose begins with standing tall with your feet.
    • Keep your hip width apart from the feet, and evenly distribute the body weight to all four corners of your feet.
    • Draw your navel in slightly while engaging your core. 
    • Stack your shoulders over your hips directly.
    • Lift your head crown and lengthen your neck.
    • Breath in and out, both deeply and evenly.

    Benefits:

    • It helps improve posture.
    • Reduce hip and back pain.
    • Strengthens core and leg muscles.
    • Regulate digestion and respiration.
    • And promotes a sense of grounding.

    2. Raised Arms Pose (Urdhva Hastasana):

    How to do:

    • Take a deep breath, inhale, and raise your arms overheated.
    • Join your hands in prayer form, reaching through your fingertips.
    • Keep your shoulder blades down and back, to your flexibility level.
    • Keep your gaze softly upwards.

    Benefits:

    • It opens the chest.
    • Increases the flexibility
    • Strengthens shoulders and arms
    • Give strength to the back muscles by lengthening the front.
    • Energises the body.

    3. Forward Fold (Uttanasana):

    How to do:

    • Inhale and hinge at your hips.
    • Fold your sleeves forward.
    • Bring your hands on top of or alongside your feet.
    • Give length to your spine as per your flexibility.
    • Relax your neck and head.
    • Let your head hang heavy for a while.

    Benefits:

    • It aids digestion.
    • It stretches the hamstrings and calves.
    • Ease, stress, tension, and fatigue.
    • Improves circulation in the body and muscles.
    • It calms the mind.

    4. Halfway Lift (Ardha Uttanasana):

    How to do:

    • Inhale and lengthen your spine.
    • Stretch your hands straight.
    • Reach to your shins or the floor.
    • Keep your face forward and bend your knee if required.

    Benefits:

    • It helps in maintaining a healthy curvature of the spine.
    • It strengthens the core and back muscles.
    • It helps prepare the body for bending postures.
    • It stretches the hamstrings.
    • Improves spinal flexibility.

    5. Plank Pose (Phalakasana):

    How to do:

    • Exhale and lower yourself to a plank position.
    • From head to heels, keep your body in a straight line and your core engaged.
    • Put your weight equally on your legs and hands. 
    • Gaze down between your hands and mind your breathing.

    Benefits:

    • Improve the posture and body balance.
    • Strengthens the core, shoulders, arms, and wrists
    • improves body flexibility.
    • Builds overall stability.
    • Removes backache.

    6. Low Plank/Knee-Chest Pose (Chaturanga Dandasana):

    How to do:

    • If you find the Plank pose challenging,
    • In this pose, you can lower your body to the mat instead of keeping it in a straight line.
    • Keep your core engaged.
    • Lengthen the spine.

    Benefits:

    • Strengthen and tone the abdominal region.
    • Relieve lower back pain.
    • Strengthen the muscles and body.
    • Provides stability.

    7. Upward-Facing Dog (Urdhva Mukha Svanasana):

    How to do:

    • Inhale and push yourself up off the mat.
    • Put your body up in an upward-facing dog pose.
    • Begin by arching your back.
    • Slowly press your chest forward.
    • Loog upward and lengthen your neck as much as possible.
    • Keep your legs strong and your core engaged.

    Benefits:

    • It stretches the body and intercostal muscles.
    • It strengthens the back, shoulders, arms, and core.
    • It helps counteract regular forward flexion activities.
    • Open the chest.
    • Improves flexibility in the spine.

    8. Downward-Facing Dog (Adho Mukha Svanasana):

    How to do:

    • Exhale and push your hips back and up (opposite of the previous pose).
    • Put your body in a downward-facing dog pose.
    • Create an inverted V shape with your body.
    • Press your heels and body on the mat to achieve the pose as closely as possible.
    • Push your chest forward and lengthen your spine.
    • Keep and maintain your gaze between your legs.

    Benefits:

    • It elongates the spine.
    • It stretches the hamstrings, calves, and shoulders.
    • It helps relieve tension and stress.
    • Strengthens the core and arms,
    • Improves circulation in the body.

    9. High Lunge (Ashwa Sanchalanasana):

    How to do:

    • Inhale and step one foot back between your hands.
    • Keep your knees to the floor and bend at a 90-degree angle.
    • Keep and maintain your hips squared and forward.
    • Keep your gaze forward and slightly upward.

    Benefits:

    • Bring stability to the body.
    • It stretches the hip flexors, quadriceps, and groyne.
    • It helps in improving joint function.
    • Strengthens the legs and core,
    • Improves balance.

    10. Halfway Lift (Ardha Uttanasana): Repeat from the other leg:

    This pose is the same as the halfway lift pose but can be done with the other leg by stepping it back between the hands. (Read number 4 pose instructions.).

    11. Forward Fold (Uttanasana): Repeat the Forward Fold:

    This pose is a replica of the forward-fold pose and can be done from a new standing position. (Read number 3 pose instructions.).

    12. Raised Arms Pose (Urdhva Hastasana): Repeat Reaching Arms Up:

    For this pose, you need to repeat the raised arm pose by keeping your arms overhead and inhaling (read number 2 pose instructions).

    13. Mountain Pose (Tadasana): Return to Starting Position:

    Exhale and return to the beginning, where we started from the mountain pose (number 1).

    This completes one round of sun salutations. You can repeat the poses with the other side as well and include this in your regular practice for improvement and warming up.

    Sun Salutations Made Easy: Modifications for New Yogis

    Sun salutations are beneficial for individuals of all levels and can be adapted by anyone. But if you are new to this practice, here are some tips to help you with better awareness and practice:

    Focus on form over perfection.

    We can achieve perfection with great practice, so it’s better to first focus on the alignment of the body correctly in each pose. It’s better to go slow and steady and adapt accordingly than push yourself and your body beyond their limits.

    Bend your knees.

    All the sequences usually require a straightened body and knees, so it is completely okay to bend your knees as many times as needed throughout the sequence practice. Poses like plank pose and downward-facing dog pose require a lot of strength, so keep your body energy neutral and bend as needed if required to maintain a proper form and protect your joints from any injury or pain.

    Utilise props

    Rather than trying one thing 100 times, try using props such as yoga blocks, which can be a great tool for all beginners. You can use them for elevating your hands for sequences like forward folds or to support you under your knees in plank pose.

    Listen to your body

    One of the most essential pieces of advice that we can give to you all reading this out there is that you should and must pay attention to the signals your body gives you. Take proper breaks whenever needed, and go slow and steady as per your convenience and health.

    Utilising and following these tips and modifications will let you enjoy the immense benefits of sun salutations at their maximum, regardless of what experience level you have.

    Conclusion

    Sun salutations are a great and fantastic way to warm up your body and begin your day. It is also effective in energising the body and relaxing it after a long day. By including this beneficial practice into your daily routine, even if you practice it a few times a week, you can experience the array of benefits it has to offer to your body, mind, and soul.

    So even though you are a beginner, don’t wait any longer; roll down your mat, and if not, you can just begin with a clean floor and give these sequences a try on your own. Be ready to be shocked and surprised by the quick benefits you will get to see in a few weeks. Make them a part of your well-being journey and guarantee the health check ahead.

    Get in Touch:
    Best Yoga Teacher Training In Bali | 100 Hour Yoga Teacher Training In Bali | 200 Hour Yoga Teacher Training In Bali