The sun salutation, also known as Surya Namaskar in Sanskrit, is a sequence of yoga poses, as determined by the name, practiced in the morning with a sun rise that links the body movement with breath. It is one of the most beautiful and best ways to warm up your body before any class while building strength and improving flexibility for better alignment. Usually, this practice is often used in the morning or before any yoga class, but you can practice it anytime as a full-body workout.
But even if you are a beginner or a practiced yogi, practicing this requires a series of steps to be followed with focus so that you can easily enjoy the benefits of these sun salutations. In this guide, we will get you through all the poses step by step with modifications. So let’s get into the learning without wasting a second, with the multitude of benefits it offers for both body and mind.
Benefits of Sun Salutations
Warm-up for the body:
Sun salutations are a great way to warm up and prepare your body for the day’s practice, yoga classes, and any physical activity. They help in moving all the muscle groups in your body gently while increasing the blood flow and loosening up all the tight areas for better practice.
Improves flexibility and strength:
Various poses aligned in sun salutation are usually related to stretching, which also strengthens different muscle groups throughout the body. So if you practice these poses daily, it can eventually result in improved flexibility and build up strength in the back, arms, legs, and core.
Increases circulation:
Practicing these salutations requires body strength, and as with any other practice, it gets your heart rate up, resulting in improved circulation throughout the body. This practice helps deliver the major nutrients and oxygen to the cells more efficiently and removes waste products from the body.
Promotes mindfulness:
Practicing these salutations requires focus on your breath and movements, which lead to a quiet mind and promote mindfulness. Through this, you can better start your day in a great way or de-stress your mind after a hectic day.
Before you begin: Be Prepared
Before you begin your movements, preparing for them is essential for an enhanced practice. While not necessary, having a yoga mat will help you with better grip and cushioning for your practice. Additionally, having comfortable clothes on will allow for better and easier movements.
Breathe Easy:
Sun salutations are all about synchronising your breath with your body movements, so here’s a quick tip:
- Inhale: Fill your belly with air and breathe in through your nose as you expand your body or lengthen it (while keeping your arms up or getting back into the plank).
- Exhale: Release all your tension as you exhale through your nose or mouth while you fold or contract your body. (Usually during a forward fold or downward-facing dog.).
Keeping your focus on these breathing techniques will help you move your body with flexibility and fluidity while connecting it with your mind throughout the sequences.
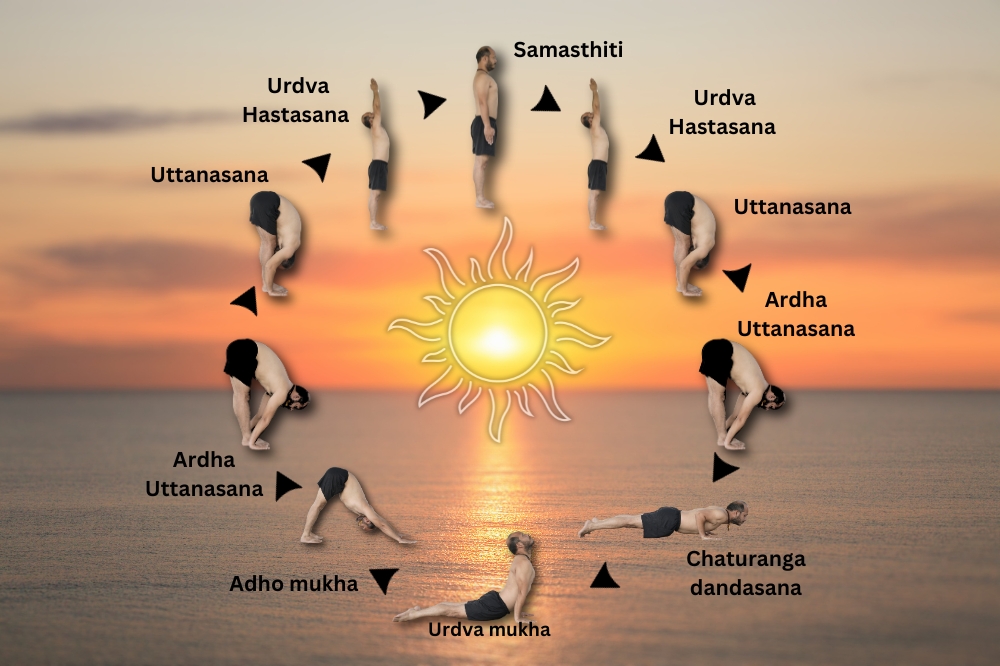
The Sun Salutation Sequence: Step-by-Step
The sun salutation sequences are a flowing series of twelve poses that are linked together with each other with breath. Let’s get to it:
1. Mountain Pose (Tadasana):

How to do:
- This pose begins with standing tall with your feet.
- Keep your hip width apart from the feet, and evenly distribute the body weight to all four corners of your feet.
- Draw your navel in slightly while engaging your core.
- Stack your shoulders over your hips directly.
- Lift your head crown and lengthen your neck.
- Breath in and out, both deeply and evenly.
Benefits:
- It helps improve posture.
- Reduce hip and back pain.
- Strengthens core and leg muscles.
- Regulate digestion and respiration.
- And promotes a sense of grounding.
2. Raised Arms Pose (Urdhva Hastasana):
How to do:
- Take a deep breath, inhale, and raise your arms overheated.
- Join your hands in prayer form, reaching through your fingertips.
- Keep your shoulder blades down and back, to your flexibility level.
- Keep your gaze softly upwards.
Benefits:
- It opens the chest.
- Increases the flexibility
- Strengthens shoulders and arms
- Give strength to the back muscles by lengthening the front.
- Energises the body.
3. Forward Fold (Uttanasana):

How to do:
- Inhale and hinge at your hips.
- Fold your sleeves forward.
- Bring your hands on top of or alongside your feet.
- Give length to your spine as per your flexibility.
- Relax your neck and head.
- Let your head hang heavy for a while.
Benefits:
- It aids digestion.
- It stretches the hamstrings and calves.
- Ease, stress, tension, and fatigue.
- Improves circulation in the body and muscles.
- It calms the mind.
4. Halfway Lift (Ardha Uttanasana):
How to do:
- Inhale and lengthen your spine.
- Stretch your hands straight.
- Reach to your shins or the floor.
- Keep your face forward and bend your knee if required.
Benefits:
- It helps in maintaining a healthy curvature of the spine.
- It strengthens the core and back muscles.
- It helps prepare the body for bending postures.
- It stretches the hamstrings.
- Improves spinal flexibility.
5. Plank Pose (Phalakasana):
How to do:
- Exhale and lower yourself to a plank position.
- From head to heels, keep your body in a straight line and your core engaged.
- Put your weight equally on your legs and hands.
- Gaze down between your hands and mind your breathing.
Benefits:
- Improve the posture and body balance.
- Strengthens the core, shoulders, arms, and wrists
- improves body flexibility.
- Builds overall stability.
- Removes backache.
6. Low Plank/Knee-Chest Pose (Chaturanga Dandasana):

How to do:
- If you find the Plank pose challenging,
- In this pose, you can lower your body to the mat instead of keeping it in a straight line.
- Keep your core engaged.
- Lengthen the spine.
Benefits:
- Strengthen and tone the abdominal region.
- Relieve lower back pain.
- Strengthen the muscles and body.
- Provides stability.
7. Upward-Facing Dog (Urdhva Mukha Svanasana):

How to do:
- Inhale and push yourself up off the mat.
- Put your body up in an upward-facing dog pose.
- Begin by arching your back.
- Slowly press your chest forward.
- Loog upward and lengthen your neck as much as possible.
- Keep your legs strong and your core engaged.
Benefits:
- It stretches the body and intercostal muscles.
- It strengthens the back, shoulders, arms, and core.
- It helps counteract regular forward flexion activities.
- Open the chest.
- Improves flexibility in the spine.
8. Downward-Facing Dog (Adho Mukha Svanasana):

How to do:
- Exhale and push your hips back and up (opposite of the previous pose).
- Put your body in a downward-facing dog pose.
- Create an inverted V shape with your body.
- Press your heels and body on the mat to achieve the pose as closely as possible.
- Push your chest forward and lengthen your spine.
- Keep and maintain your gaze between your legs.
Benefits:
- It elongates the spine.
- It stretches the hamstrings, calves, and shoulders.
- It helps relieve tension and stress.
- Strengthens the core and arms,
- Improves circulation in the body.
9. High Lunge (Ashwa Sanchalanasana):
How to do:
- Inhale and step one foot back between your hands.
- Keep your knees to the floor and bend at a 90-degree angle.
- Keep and maintain your hips squared and forward.
- Keep your gaze forward and slightly upward.
Benefits:
- Bring stability to the body.
- It stretches the hip flexors, quadriceps, and groyne.
- It helps in improving joint function.
- Strengthens the legs and core,
- Improves balance.
10. Halfway Lift (Ardha Uttanasana): Repeat from the other leg:
This pose is the same as the halfway lift pose but can be done with the other leg by stepping it back between the hands. (Read number 4 pose instructions.).
11. Forward Fold (Uttanasana): Repeat the Forward Fold:
This pose is a replica of the forward-fold pose and can be done from a new standing position. (Read number 3 pose instructions.).
12. Raised Arms Pose (Urdhva Hastasana): Repeat Reaching Arms Up:
For this pose, you need to repeat the raised arm pose by keeping your arms overhead and inhaling (read number 2 pose instructions).
13. Mountain Pose (Tadasana): Return to Starting Position:
Exhale and return to the beginning, where we started from the mountain pose (number 1).
This completes one round of sun salutations. You can repeat the poses with the other side as well and include this in your regular practice for improvement and warming up.
Sun Salutations Made Easy: Modifications for New Yogis
Sun salutations are beneficial for individuals of all levels and can be adapted by anyone. But if you are new to this practice, here are some tips to help you with better awareness and practice:
Focus on form over perfection.
We can achieve perfection with great practice, so it’s better to first focus on the alignment of the body correctly in each pose. It’s better to go slow and steady and adapt accordingly than push yourself and your body beyond their limits.
Bend your knees.
All the sequences usually require a straightened body and knees, so it is completely okay to bend your knees as many times as needed throughout the sequence practice. Poses like plank pose and downward-facing dog pose require a lot of strength, so keep your body energy neutral and bend as needed if required to maintain a proper form and protect your joints from any injury or pain.
Utilise props
Rather than trying one thing 100 times, try using props such as yoga blocks, which can be a great tool for all beginners. You can use them for elevating your hands for sequences like forward folds or to support you under your knees in plank pose.
Listen to your body
One of the most essential pieces of advice that we can give to you all reading this out there is that you should and must pay attention to the signals your body gives you. Take proper breaks whenever needed, and go slow and steady as per your convenience and health.
Utilising and following these tips and modifications will let you enjoy the immense benefits of sun salutations at their maximum, regardless of what experience level you have.
Conclusion
Sun salutations are a great and fantastic way to warm up your body and begin your day. It is also effective in energising the body and relaxing it after a long day. By including this beneficial practice into your daily routine, even if you practice it a few times a week, you can experience the array of benefits it has to offer to your body, mind, and soul.
So even though you are a beginner, don’t wait any longer; roll down your mat, and if not, you can just begin with a clean floor and give these sequences a try on your own. Be ready to be shocked and surprised by the quick benefits you will get to see in a few weeks. Make them a part of your well-being journey and guarantee the health check ahead.
Get in Touch:
Best Yoga Teacher Training In Bali | 100 Hour Yoga Teacher Training In Bali | 200 Hour Yoga Teacher Training In Bali